UIKit - TableView 구현 (코드)
TableView 구현 (코드)
SceneDelegate.swift
1
2
3
4
5
6
7
8
9
10
11
12
13
14
15
16
17
18
19
20
21
22
23
24
import UIKit

class SceneDelegate: UIResponder, UIWindowSceneDelegate {

    var window: UIWindow?

    // 앱 최초 진입 시점에 실행
    func scene(_ scene: UIScene, willConnectTo session: UISceneSession, options connectionOptions: UIScene.ConnectionOptions) {

        guard let windowScene = (scene as? UIWindowScene) else { return }

        // UIWindow : 하나의 화면을 표현하는 객체
        window = UIWindow(windowScene: windowScene)

        let naviVC = UINavigationController(rootViewController: ViewController())

        // 최상위 ViewController로 NavigationController를 설정
        window?.rootViewController = naviVC
        // 메인 윈도우 및 화면에 표시하도록 설정
        window?.makeKeyAndVisible()
    }

    // 생략...
}
위 코드는 테이블뷰와는 별개의 역할을 수행하는데, 스토리보드를 통해 NavigationController를 쉽게 설정해준 것과는 달리 코드로 구현할 경우에는 위와 같이 앱 최초 진입 시점에서 NavigationController를 설정해줘야함.
ViewController.swift
1
2
3
4
5
6
7
8
9
10
11
12
13
14
15
16
17
18
19
20
21
22
23
24
25
26
27
28
29
30
31
32
33
34
35
36
37
38
39
40
41
42
43
44
45
46
47
48
49
50
51
52
53
54
55
56
57
58
59
60
61
62
63
64
65
66
67
68
69
70
71
72
73
74
75
76
77
78
79
80
81
82
83
84
85
86
87
88
89
90
91
import UIKit
final class ViewController: UIViewController {
// 테이블 뷰 인스턴스 생성
private let tableView = UITableView()
// 더미 데이터
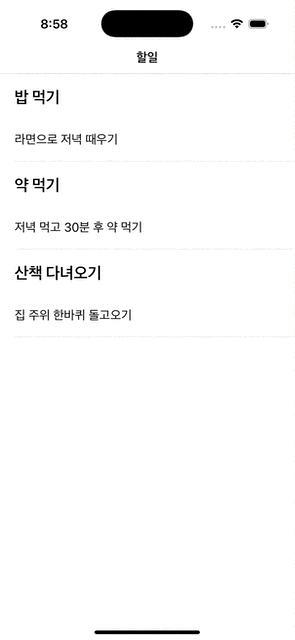
var todos: Array<Todo> = [
Todo(title: "밥 먹기", detail: "라면으로 저녁 때우기"),
Todo(title: "약 먹기", detail: "저녁 먹고 30분 후 약 먹기"),
Todo(title: "산책 다녀오기", detail: "집 주위 한바퀴 돌고오기")
]
override func viewDidLoad() {
super.viewDidLoad()
// 테이블뷰 DataSource 설정
self.tableView.dataSource = self
// 테이블뷰 Delegate 설정
self.tableView.delegate = self
// Cell 등록
self.tableView.register(TodoTableViewCell.self, forCellReuseIdentifier: "todoCell")
makeUI()
}
func makeUI(){
// 테이블 뷰 셀 높이 설정
tableView.rowHeight = 120
self.view.addSubview(tableView)
setAutoLayout()
setNavigationBar()
}
func setAutoLayout(){
tableView.translatesAutoresizingMaskIntoConstraints = false
NSLayoutConstraint.activate([
tableView.leadingAnchor.constraint(equalTo: self.view.leadingAnchor, constant: 0),
tableView.trailingAnchor.constraint(equalTo: self.view.trailingAnchor, constant: 0),
tableView.topAnchor.constraint(equalTo: self.view.topAnchor, constant: 0),
tableView.bottomAnchor.constraint(equalTo: self.view.bottomAnchor, constant: 0)
])
}
func setNavigationBar(){
self.title = "할일"
let appearance = UINavigationBarAppearance()
appearance.configureWithOpaqueBackground()
appearance.backgroundColor = .white
self.navigationController?.navigationBar.standardAppearance = appearance
self.navigationController?.navigationBar.compactAppearance = appearance
self.navigationController?.navigationBar.scrollEdgeAppearance = appearance
}
}
extension ViewController: UITableViewDataSource{
// 셀 개수 반환
func tableView(_ tableView: UITableView, numberOfRowsInSection section: Int) -> Int {
return self.todos.count
}
// 셀 구성
func tableView(_ tableView: UITableView, cellForRowAt indexPath: IndexPath) -> UITableViewCell {
let cell = self.tableView.dequeueReusableCell(withIdentifier: "todoCell", for: indexPath) as! TodoTableViewCell
cell.configureCell(todo: self.todos[indexPath.row])
return cell
}
}
extension ViewController: UITableViewDelegate{
// 테이블뷰 셀이 선택되었을 때 실행됨
func tableView(_ tableView: UITableView, didSelectRowAt indexPath: IndexPath) {
let vc = DetailViewController()
vc.configure(todo: todos[indexPath.row])
self.navigationController?.pushViewController(vc, animated: true)
}
}
위 코드는 테이블뷰를 생성하고 구성하는 코드로 중요한 부분을 살펴보겠음.
1
2
3
4
5
6
7
8
9
10
11
12
13
14
15
16
17
18
  ...

    override func viewDidLoad() {
        super.viewDidLoad()

        // 테이블뷰 DataSource 설정
        self.tableView.dataSource = self

        // 테이블뷰 Delegate 설정
        self.tableView.delegate = self

        // Cell 등록
        self.tableView.register(TodoTableViewCell.self, forCellReuseIdentifier: "todoCell")

        makeUI()
    }

  ...
위 코드는 view를 메모리에 올린 시점에서 실행되는데, TableView 인스턴스에 datasource와 delegate를 설정하고 tableView에 셀을 등록하는 역할을 수행함.
스토리보드에서 구현하는 것과는 달리 코드로 구현을 할 때는 자동으로 셀이 등록되지 않기 때문에
dequeueReusableCell메서드를 사용해서cell을 재사용하기 위해서는 등록을 먼저 해줘야만함.
1
2
3
4
5
6
7
8
9
10
11
12
13
14
15
16
extension ViewController: UITableViewDataSource{

    // 셀 개수 반환
    func tableView(_ tableView: UITableView, numberOfRowsInSection section: Int) -> Int {
        return self.todos.count
    }

    // 셀 구성
    func tableView(_ tableView: UITableView, cellForRowAt indexPath: IndexPath) -> UITableViewCell {
        let cell = self.tableView.dequeueReusableCell(withIdentifier: "todoCell", for: indexPath) as! TodoTableViewCell

        cell.configureCell(todo: self.todos[indexPath.row])

        return cell
    }
}
UITableViewDataSource 프로토콜을 채택하여 필수 메서드를 구현함. 각 메서드는 셀의 개수, 셀을 구성하는 역할을 수행하며 테이블뷰를 사용하는데 필수적으로 구현해야만함.
dequeueReusableCell메서드는 테이블뷰에 등록되어 있는 셀을 가져오는 역할을 함.
1
2
3
4
5
6
7
8
9
10
11
extension ViewController: UITableViewDelegate{

    // 테이블뷰 셀이 선택되었을 때 실행됨
    func tableView(_ tableView: UITableView, didSelectRowAt indexPath: IndexPath) {
        let vc = DetailViewController()

        vc.configure(todo: todos[indexPath.row])

        self.navigationController?.pushViewController(vc, animated: true)
    }
}
UITableViewDelegate 프로토콜은 테이블뷰의 델리게이트 패턴을 사용해야할 때 구현해야하며, 위 메서드는 테이블뷰에 셀이 선택되었을 때 동작을 처리함.
UITableViewDelegate는 동작(ex. 셀 선택, 스크롤 등)을 처리해야할 때 구현한다고 생각하면 됨.
TodoTableViewCell.swift
1
2
3
4
5
6
7
8
9
10
11
12
13
14
15
16
17
18
19
20
21
22
23
24
25
26
27
28
29
30
31
32
33
34
35
36
37
38
39
40
41
42
43
44
45
46
47
48
49
50
51
52
53
54
55
56
57
58
59
60
61
62
63
64
65
66
67
68
69
70
import UIKit

class TodoTableViewCell: UITableViewCell {

    let titleLabel: UILabel = {
        let label = UILabel()

        label.font = UIFont.boldSystemFont(ofSize: 22)

        return label
    }()

    let detailLabel: UILabel = {
        let label = UILabel()

        label.font = UIFont.systemFont(ofSize: 17)

        return label
    }()

    lazy var stackView: UIStackView = {
        let stackView = UIStackView(arrangedSubviews: [titleLabel, detailLabel])

        stackView.axis = .vertical
        stackView.spacing = 15
        stackView.alignment = .fill
        stackView.distribution = .fill

        return stackView
    }()

    override init(style: UITableViewCell.CellStyle, reuseIdentifier: String?) {
        super.init(style: style, reuseIdentifier: reuseIdentifier)

        makeUI()
    }

    required init?(coder: NSCoder) {
        fatalError("init(coder:) has not been implemented")
    }

    override func awakeFromNib() {
        super.awakeFromNib()
    }

    override func setSelected(_ selected: Bool, animated: Bool) {
        super.setSelected(selected, animated: animated)
    }

    func makeUI(){
        self.contentView.addSubview(stackView)

        setAutoLayout()
    }

    func setAutoLayout(){
        stackView.translatesAutoresizingMaskIntoConstraints = false

        NSLayoutConstraint.activate([
            stackView.leadingAnchor.constraint(equalTo: self.contentView.leadingAnchor, constant: 20),
            stackView.trailingAnchor.constraint(equalTo: self.contentView.trailingAnchor, constant: -20),
            stackView.topAnchor.constraint(equalTo: self.contentView.topAnchor, constant: 0)
        ])
    }

    func configureCell(todo: Todo){
        self.titleLabel.text = todo.title
        self.detailLabel.text = todo.detail
    }
}
위 코드는 테이블뷰에서 사용되는 셀을 구현한 코드임.
1
2
3
4
5
6
7
8
9
10
11
12
13
...

    func setAutoLayout(){
        stackView.translatesAutoresizingMaskIntoConstraints = false

        NSLayoutConstraint.activate([
            stackView.leadingAnchor.constraint(equalTo: self.contentView.leadingAnchor, constant: 20),
            stackView.trailingAnchor.constraint(equalTo: self.contentView.trailingAnchor, constant: -20),
            stackView.topAnchor.constraint(equalTo: self.contentView.topAnchor, constant: 0)
        ])
    }

...
오토레이아웃을 잡을 때 contentView를 사용하는 이유는 셀 위에 올리는 디자인 요소들은 전부 contentView 위에서 그려지기 때문임.
DetailViewController.swift
1
2
3
4
5
6
7
8
9
10
11
12
13
14
15
16
17
18
19
20
21
22
23
24
25
26
27
28
29
30
31
32
33
34
35
36
37
38
39
40
41
42
43
44
45
46
47
48
49
50
51
52
53
54
55
56
import UIKit

class DetailViewController: UIViewController {

    private let titleLabel: UILabel = {
        let label = UILabel()

        label.font = UIFont.boldSystemFont(ofSize: 22)

        return label
    }()

    private let detailLabel: UILabel = {
        let label = UILabel()

        label.font = UIFont.systemFont(ofSize: 17)

        return label
    }()

    private lazy var stackView: UIStackView = {
        let stackView = UIStackView(arrangedSubviews: [titleLabel, detailLabel])

        stackView.axis = .vertical
        stackView.spacing = 10
        stackView.alignment = .fill
        stackView.distribution = .fill

        return stackView
    }()

    override func viewDidLoad() {
        super.viewDidLoad()

        makeUI()
    }

    func makeUI(){
        self.view.backgroundColor = .white

        self.view.addSubview(stackView)

        stackView.translatesAutoresizingMaskIntoConstraints = false

        NSLayoutConstraint.activate([
            stackView.leadingAnchor.constraint(equalTo: self.view.leadingAnchor, constant: 20),
            stackView.trailingAnchor.constraint(equalTo: self.view.trailingAnchor, constant: -20),
            stackView.centerYAnchor.constraint(equalTo: self.view.centerYAnchor)
        ])
    }

    func configure(todo: Todo){
        self.titleLabel.text = todo.title
        self.detailLabel.text = todo.detail
    }
}
결과